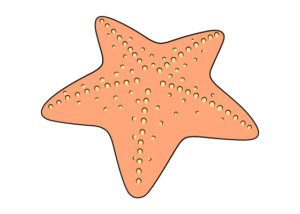
How to Draw a Starfish Step by Step
This tutorial shows how to draw a starfish in just four quick steps. It provides easy to follow examples and simple tips.

Starfish (or sea stars) are interesting and fairly unusual marine creatures with very distinct shapes. Drawing one can be quite easy, however, the tips provided in this guide can help you further simplify the process while keeping your artwork looking interesting.
You can see a preview of the drawing steps in the image above but there are additional more in depth examples shown below.
Start the tutorial in pencil and make light lines to make it easy to correct any mistakes. You can darken them later once you have all parts of the starfish outlined.
Step 1 – Draw the Body/Arms of the Starfish

A starfish’s arms essentially define the shape of it’s body. Draw these as shown in the step by step illustration above.
In this example the subject is drawn as though it’s viewed on an angle. Drawing in such a way will allow you to show off the starfish’s shape while at the same time keeping your artwork looking more interesting than if you were to use something like a direct overhead view.
When drawing from an angle similar to that shown in this example you generally you want to start with the starfish’s forward most facing arm. You can then add the remaining arms in a clockwise direction.
To show perspective make the forward facing arm a little larger and longer. Make the sideways facing arms a little shorter/smaller. Make the arms in the back the smallest and shortest.

You can see a larger version of the drawing you should aim for at this stage above.
Step 2 – Draw the Larger Bumps Along the Starfish’s Arms

Starfishes often have a series of bumps running along the middle of each of their arms. Draw a guide line along each arm to help you position these (as shown in the example). Make these lines slightly curved to help emphasize the shape of the starfish’s body. Also draw them to be very light (barely visible) so that you can easily erase them afterwards. The lines in the example are dark just to make them easier for you to see.

Draw the bumps along the lines. Give them oval-like shapes but leave the bottoms of their outlines open (where they are attached to the starfish). Carefully erase the guide lines afterwards.
Step 3 – Draw the Smaller Bumps

For the last set of details add some smaller bumps randomly positioned throughout the starfish’s body/arms. Starfishes generally have a lot more of these but you don’t need to draw out every single bump. Just creating a sense of them being there is enough.
Once you’ve added the bumps you can trace over your drawing with darker pencil lines or a thin black marker.
Step 4 – Color the Starfish Orange & Yellow

Good color choices for the starfish can be orange for it’s main body/arms and yellow for the bumps (as used in this example). However, starfishes come in many colors so you can use a different combination if you like.
Unless you are coloring digitally you should first apply whatever color you choose for the main body and leave the bumps white. Color around the bumps in such way as to complete their oval shapes (filling the gaps that were left there for the line drawing). Afterwards, fill in each of the bumps with your color of choice as well.
If drawing digitally you can apply the color you choose for the bumps right over top of the body’s main color (which is much easier).
Conclusion – Drawing a Starfish can be Quite Easy
As mentioned at the star of the tutorial, starfishes are fairly interesting marine creatures due to their very distinct shapes. Drawing a starfish is not particularly complicated. However, you can make thing seven simpler by using a good drawing of order (larger to smaller) and some basic guide lines. Choosing a good angle for your subject can also be very important as it can help you better show off it’s shape and make your drawing more interesting to look at. Finally, using a good color combination can also help your artwork stand out and make it more easily recognizable.
If you like these kinds of easy to follow step by step guides also be sure to try the following:

")
")